

Foil Shaver Travel Deformation? Complete Guide to Body Repair and Blade Head Calibration
What’s the thing you dread most when you travel? That’s right, it’s opening your suitcase and finding your beloved foil shaver slightly crooked from being squeezed, with the head misaligned, significantly reducing its shaving performance. Business travelers, backpackers, and frequent travelers have almost all had this experience—even if you pack it carefully, it can still get “damaged” during transport.
.Don’t panic, this isn’t irreversible. This article will teach you how to keep your foil shaver smooth, skin-friendly, and safe during your travels, covering topics such as minor body deformation repair, shaver head calibration, temporary travel treatment, daily maintenance, tool preparation, user experience, and FAQs. After reading, you’ll not only master repair techniques but also prevent problems and maximize the lifespan and effectiveness of your foil shaver .
Table of Contents
I. Common Foil Shaver Issues and Causes During Travel
Foil shavers during travel are prone to the following issues:
The blade tip is dented or misaligned.
- The foil is very thin and can dent easily under slight pressure.
- The internal blades may become misaligned due to vibrations during transport, causing a pulling sensation when shaving.
- User feedback indicates that long-haul flights or contact with hard objects in luggage are the most common causes of blade misalignment.
The fuselage casing is bent or cracked.
- Plastic or metal casings are prone to uneven stress when luggage is squeezed or dropped.
- A bent outer shell may prevent the blade from fitting flat against the face and may even affect the internal motor.
Reduced shaving performance or snagging
- Dust, hair residue, or a slightly off-center blade can all cause uneven shaving.
- Users may experience a “pulling” or “stinging” sensation while shaving, which indicates that the blade and foil are not aligned.
Power supply or travel lock problem
- Accidental switch activation or failure to open the travel lock may cause motor malfunction or blade damage.
Tip: Most problems are not permanent damage, and most can be recovered if the correct method is used.
II. Foil Shaver Structural Analysis: Why is it prone to deformation?
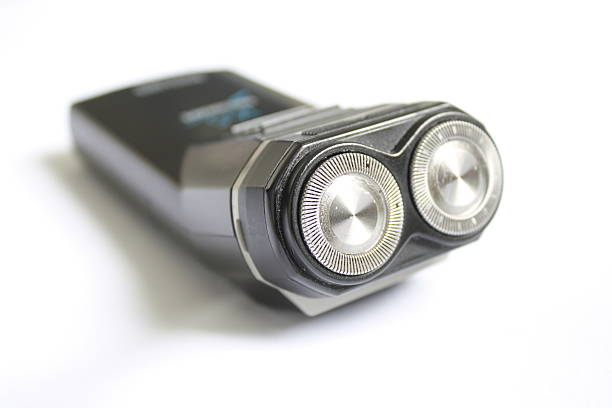
To fix the problem, first understand the Foil Shaver design:
- Foil: Covers the blade, protects the skin, and traps hair.
- Cutter: A blade that vibrates rapidly inside to cut hair.
- Body: Supports the cutting head and transmits power; it is precisely designed.
Because of its precision, even slight external force can cause the foil to dent or the blades to misalign. During travel, especially when squeezed by hard objects or dropped, the foil is easily deformed.
User experience: Even with high-end Foil Shaver models, continuous pressure or bending of the foil can affect the smoothness of a shave.
III. Repair methods for minor deformation of the fuselage
1. Visual inspection
- Carefully observe whether the blade head and the machine body are level.
- Check if the foil is dented or curled up.
- Check the fuselage for cracks or bends.
Tip: Gently touch the edge of the blade with your finger to check if it’s flat. If there’s a noticeable misalignment, do not turn on the power.
2. Flexible adjustment
- Gently press the pressure area with your fingers or a rubber pad.
- The plastic casing can be softened by blowing air at a low temperature and then slowly straightened.
- Avoid applying excessive force; otherwise, the internal blades may be damaged.
3. Confirm that the cutter head is installed in place.
- Disassemble the cutter head and check if the clips are secure.
- Align and install again until you hear a “click.”
Small oversight: Many users assume the blade is fine, but it’s actually just not installed tightly enough. Proper installation often restores smoothness immediately.

IV. Foil Shaver Tip Offset Calibration: Practical Steps
Blade misalignment is a common problem after travel, affecting shaving smoothness and closeness. The calibration steps are as follows:
1. Disassemble the cutter head
- Press the release button or pull the ring.
- Gently lift the blade.
- Separate the foil and blades, ready for cleaning.
2. Clean up any internal residue.
- Use a soft-bristled brush to remove any hair between the blade and the foil.
- Clean grease with cotton swabs
- Avoid scratching the foil.
User feedback: The pulling sensation is actually caused by dust or tiny hair clogging the area. Cleaning it significantly improves the condition.
3. Adjust the blade position
- Align the bottom of the blade with the seat.
- Ensure the blade is parallel to the foil.
- Replace the foil and press gently until it clicks.
4. Install and test
- Manually touch the foil to confirm flatness.
- Press the switch lightly for 1–2 seconds.
- Feel if the vibration is even
Note: If the vibration is significantly different on one side of the foil mesh, it needs to be disassembled and recalibrated.
V. Travel Temporary Foil Shaver Repair Techniques
Many problems can be solved without tools:
- Protective packaging: Use the included protective cover, soft cloth, and soft clothing and luggage as insulation.
- Credit cards or hard cards: Gently stretch the slightly dented foil.
- Soft cloth or paper towel: Protect the edges of the Foil Shaver head before operation.
- Mirror inspection: Ensure the Foil Shaver head is aligned with your face.
Tip: While temporary fixes aren’t as precise as professional tools, they’re sufficient for a proper shave.
VI. Routine Maintenance and Calibration Procedures
Keeping your Foil Shaver smooth requires more than just repairs; it also requires regular maintenance:
- After each use: Rinse the blade head and shake dry.
- Weekly in-depth inspection: Remove foil and clean dust.
- Replace the blade regularly: generally every 12–18 months.
User experience: A consistently cleaned and calibrated foil shaver will remain as smooth as new, even with frequent travel.

VII. Troubleshooting before and after blade replacement
- Incomplete shave or stubble: Blade misalignment or foil dent.
- Pulling sensation when shaving: Blade wear or improper installation
- Abnormal sound: Improper gap between the blade and the foil or foreign object stuck.
Recommendation: Disassemble and clean + calibrate, or replace the cutter head if necessary.
8. Essential Travel Tools
- Small, soft-bristled brush
- Miniature screwdriver
- Protective cover/cloth box
- Travel storage bag
Preparing these small tools before heading out can handle almost any travel blade issue.
9. FAQ
Q1: What should I do if the cutter head is deformed?
Wrap the cloth around the object and press gently. Disassemble, clean, and then calibrate.
Q2: When should the cutter head be replaced?
If there is significant pulling, incomplete shaving, or dents, it should usually be replaced every 12–18 months.
Q3: Can damaged foil mesh be repaired?
Slight bending can be fine-tuned, but large-area damage requires replacement.
Q4: Is a travel lock necessary?
To prevent accidental power consumption or damage to components, it is recommended to turn it on when leaving the house.
Q5: Will the deformation of the casing damage the motor?
Slight deformation is not a problem, but internal misalignment will increase the load and require repair before use.
X. Conclusion
Slight deformation or head misalignment of your foil shaver during travel is not a problem. With proper body repair, head calibration, and routine maintenance, your foil shaver can still provide a smooth, skin-friendly, and safe experience.
Recommendation: Take precautions before going out, check regularly during your trip, and handle any problems as described in this article to ensure a smooth shaving experience just like at home.
Want a smooth, safe shaving experience while traveling? Choose our Foil Shaver , with its professional design and precise blade calibration, making every shave as perfect as at home.
Related Posts
Daily use of Foil Shaver for a year: A record of changes in skin condition
-
Posted by
 Alva Winifred

Foil Shaver charging port oxidation? A complete guide to cleaning, repairing, and preventing oxidation.
-
Posted by
Alva Winifred

The Cold Shaving Revolution: A New Era of Electric Foil Shaver and Freezing Shaving
-
Posted by
Alva Winifred